Pages

Showing posts with label Information. Show all posts

Linux's History

Linux was developed as a freely distributable version of UNIX. UNIX is the most widely used operating system in the world and has long been the standard for high-performance workstations and larger servers. UNIX, first developed in 1969, has a strong programmer-oriented user group that supports the operating system.

"How did UNIX get its name? It was based on an operating systems called MULTICS (MULTiplexed Information and Computing System). Ken Thompson, Dennis Ritchie, and Brian Kernighan were involved the design of a new operating system based on MULTICS that would be much simpler. They called the new operating system UNICS (Uniplexed Information and Computing System), which was quickly changed to UNIX."

Because UNIX is a commercial product, it must be bought for each platform it runs on. Licensing fees for UNIX versions for PC machines range from a few hundred dollars to several thousand. In an attempt to make UNIX widely available for no cost to those who want to experiment with it, a number of public domain UNIX systems have been developed over the years.

One of the early UNIX workalikes was Minix, written by Andy Tanenbaum. Although Minix didn't have a full range of features, it provided a small operating system that could be used on PC machines. To expand on Minix, a number of users started developing an enhanced operating system that would take advantage of the 80386 CPU's architecture. One of the primary developers of this system, which became known as Linux, was Linus Torvalds of the University of Helsinki. He released an early version of Linux in 1991. A first commercial, almost bug-free release was unleashed to the programming community in March 1992.

Soon, many programmers were working on Linux, and as the challenge and excitement of producing a growing UNIX workalike caught on, Linux grew at a remarkable rate. As the number of developers working on Linux grew, the entire UNIX workalike operating system was eventually completed and now includes all the tools you will find in a commercial UNIX product. Linux continues to grow as programmers adapt features and programs that were originally written as commercial UNIX products to Linux. New versions of Linux and its utilities are appearing at an astounding rate. New releases often appear weekly.

To avoid any charges for Linux, the Linux developers do not use any code from other UNIX systems. There are no licensing fees involved with the Linux operating system, and part of its mandate is to be freely available. Some companies have undertaken the task of assembling and testing versions of Linux, which they package on a CD-ROM for a (usually) minimal price.

Linux is not based on a single version of UNIX; it is a consolidation of the best features of BSD UNIX and System V. BSD UNIX was developed at the University of California at Berkeley, starting in 1977. Several major releases increased the power of BSD UNIX. Several standard UNIX programs originated at BSD, although BSD stopped its UNIX development in the early 1990s. AT&T, which developed the first version of UNIX, continued their UNIX development by producing a series of UNIX versions called System III, System IV, and System V. Linux uses the last primary release of BSD UNIX called 4.4BSD as its base and takes some other features from the latest release of System V, called System V Release 4 (SVR4).

Does your site have a privacy statement?

If you have a commercial or a high visibility site, it's a good idea to publish your privacy policy so that your visitors know how you will handle the information they provide. Following is a list of subjects you may want to cover in your privacy statement:
  • Automatically collected information: If your web server logs information about which pages visitors view, IP address, host name, browser type, or other information that's automatically collected by the software you use to serve your visitors, list the types of information you collect and how you use them. For example, you maybe using browser type information to fine tune your pages to specific browsers and other information in web server logs to administer and troubleshoot technical problems.
  • Personal information: How you use any personal information that you collect from visitors should be documented here. For example, if you allow visitors to purchase products online, explain if you share or sell the information you gather to third parties. Also explain why it's necessary to obtain personal information such as age if your product is aimed to adults. Parents maybe specially interested in whether your site ask for personal information from children without adult supervision.
  • Security: Explain what steps you have taken to secure and backup the information you gather from visitors. For example, if you obtain credit card information over the web explain if you're using a secure protocols such as SSL (Secure Socket Layer) / digital IDs to protect the information transferred between the browser and your web server.
  • Public forums: Explain to visitors that information they provide on some sections of your site is public. For example, information provided on forums, guest books, message boards and news groups can be read by others and you should warn visitors to be careful when posting personal information on them. Also explain how you handle information collected from any polls, auctions, electronic newsletters, contests and sweepstakes you may have on your site.
  • Advertisers: If you use third party ad company to display advertisements on your site, inform your visitors of this. Also explain how the outside ad company may use cookies and other information gathering methods to target ads to visitors. Don't forget to include this information even if you use just a free banner exchange program on your pages.
  • External links: Almost every web site link to external sites, but your visitors may not realize that they are being directed to a third party web site when they click on links on your site. If you have any external links, explain that you're not responsible for the content and security of third party sites.
  • Contact information: Finally provide information your visitors can use to contact you if they have any questions regarding your privacy policy.
Need more help? Try the privacy statement wizards below, but be sure to read the text generated by them and to refine the statement to fit your web site. Don't forget to add a link to your privacy statement from your home page and other high visible pages.

HP launches key-management appliance

The management of encryption keys has become one of the most important issues in security, according to Hewlett-Packard, which has launched an appliance to help companies better manage their deployments of the technology.

Announced at Storage Networking World Europe 2007 in Frankfurt, Germany, on Monday, the StorageWorks Secure Key Manager consolidates key management for encryption devices in enterprises and medium-size businesses, HP said. More and more companies are adopting key encryption, where data is encrypted so that anyone attempting to gain unauthorized access to a system will be unable to access it without the key, according to HP.

To keep documents secure, every time a user accesses a document a new key will be issued, resulting

in organizations having thousands, or even millions, of keys, which have to be carefully managed if the system is to keep track of them.

Each key is unique and cannot be replaced, which can have potentially disastrous results if the key to a crucial document is lost, said Bob Wilson, vice president for HP's Nearline Storage organization.

"Key management is the key security issue, and no pun intended," said Wilson. "Now we have the ability (with the key-management appliance) to take key management and run it across the entire company."

HP StorageWorks Secure Key Manager will initially support HP hardware such as the LTO-4 tape library, and the company hopes to get support for it from other suppliers. An entry-level system costs $59,900 for the two appliances necessary to send and receive encrypted data. Extra appliances are $32,900.

Along with the HP StorageWorks Secure Key System, the company launched the StorageWorks 9000 Virtual Library System--a two-stage backup system, with initial backups to disk, followed by data encryption and migration to tape. No details on price were released.

According to HP and other companies, such as IBM, tape is enjoying a resurgence in popularity, as it is the cheapest way of storing data and companies are finding themselves having to keep more and more data.

Essential freeware for UMPCs

So, you've finally taken the dive and hopped onto the UMPC bandwagon. But here's the problem. With an underpowered processor and limited storage space, your favorite and oh-so-expensive commercial software is screaming for help everytime you try and launch it. Need to resize some images? Take your time and make dinner while Photoshop loads. Rushing a PowerPoint presentation? Take a shower while waiting for Microsoft Office 2007 to launch.

Fortunately, for every commercial software there is a freeware alternative out there. But before we continue, brush aside the mentality that just because it's free one should expect poor support and pathetic features. In some cases, these freeware are open-source applications created by expert programmers who want to give something back to the community. In others, commercial companies create free versions of their professional software by removing features that most home users will never use.

In most cases, by focusing on the most common features required by the mainstream user, these freeware alternatives not only have a smaller footprint, they run much faster than professional commercial applications. Here is our list of favorite freeware which will make your UMPC feel almost as quick as your main PC.

For the purpose of this article, it is assumed that your UMPC runs on Windows XP or Vista operating system. Linux users: You have enough freeware out there as it is to make this article irrelevant.

Antivirus
For the truly paranoid (like us), one should not even think of accessing the Internet without an antivirus application installed. In fact, the first task one should perform is to update the virus definition to ensure your PC is protected.

McAfee and Norton may be the big names in the virus protection business, but their yearly subscription plan and resource usage are really a pain for a UMPC to handle. Avast and AVG are two lesser-known players which have created free versions of their antivirus suite, which are more than sufficient protection for the average user. But our vote goes to AVG, which also supplies free anti-spyware and anti-rootkit programs to boost your system immunity.

Office suite
Microsoft Office is the de facto standard for productivity tasks. Unfortunately, its rich feature set is also an Achilles' heel. Some believe that most users never touch 90 percent of the available functions in Office, despite paying the full price for the software.

A good alternative is Openoffice, which is compatible with Microsoft office documents and runs significantly faster with a smaller footprint. Though it may not have email and organizer features like Microsoft Outlook, that is easily remedied with the free Mozilla Suite--which includes a Web browser, email client, IRC chat and even HTML editing.

Security
With so many cases of private data being leaked after a laptop was lost or stolen, the portability of a UMPC is also a curse as its small footprint makes it easier to lose and steal. Add to the fact most UMPCs do not possess strong security features like fingerprint sensor and TPM chip, and that putting sensitive information in them is a can of worms one does not want to open.

Truecrypt is an impressive yet free solution for the paranoid. It not only creates encrypted virtual vaults in which you can store your important data, it can also encrypt entire drives. In fact, this software can even secure flash drives and install a portable version of Truecrypt, thereby removing the need for the PC to have the software installed to decrypt the drive.

If you are really from the deep end of the paranoid pool, a hidden Truecrypt file actually creates two encrypted volumes in one file. Input one password, and the less sensitive volume opens up. Input a different password, and the real treasure trove is accessed.

Tech support for your parents

Tip 1: Install the software they need
If you're visiting your parents over the holidays, it's a good time to bring the parents' computer up-to-date or to make sure it's protected from viruses and the like (consider doing so whether or not they ask you). When you're packing for the trip, take the time to prepare a USB memory key or a CD with some useful software.

What you should do
The best thing you can do for a parent who has a Windows computer is to make sure automatic updates are turned on so that the system is getting the important security updates that Microsoft sends out.

Windows XP
Right click on My Computer (either on the desktop or in your start menu) then click Properties. Then click the Automatic Updates tab and turn on Automatic.

Windows Vista
Click on the Windows Button, then Control Panel. Click the System and Maintenance heading and then under the Windows Update section click Turn automatic updating on or off. Check Install updates automatically (recommended).

Here's the other software you should consider installing.
  • Start with free anti-spyware utilities, such as Spybot Search and Destroy (which can even immunise against possible attacks) and Ad-aware SE. To complement Spybot, you may also find Spyware Blaster a boon which acts as a preventative, rather than a solution.
  • For antispam and antivirus software, you might want to spring for the paid, professionally supported utilities, such as Kaspersky AntiVirus 7, or ZoneAlarm Internet Security Suite which has an antivirus, firewall and spamkiller built in.
  • While you're loading up a USB key or a CD-ROM with software, add some digital pictures of yourself and your family to it and maybe some bookmarks--say, links to your online family photo album.
  • Other software you might want to install: The Instant Messaging app that you use, so that anytime your mum or dad is sitting at the computer, they can chat with you in real time--or ask for help--for free.
The FireFox Alternative
As much as we like it, be careful before installing the fantastic Mozilla Firefox browser for non-tech-savvy users. There are still some sites that don't work as they're supposed to with this browser, and you don't want to be telling your parents to switch back and forth between it and Internet Explorer all the time.

Mind you it could save you a potential tech support nightmare by avoiding Internet Explorer security vulnerabilities--so if you do install it, make sure that your parents' online banking and so forth work with it first, and make sure all the relevant flash/shockwave plugins are installed.

Five ways to make your PC more like a Mac

As we move further into the 21st century, one issue divides the world more than any other. Microsoft Windows and Mac OS X are different ways of moving data round on a computer, so it's natural that they inspire the sort of ideological conflict not seen since Lenin chucked a stool at Adam Smith down at the Pedagogue's Arms.

To borrow a metaphor from Spartacus, some people like oysters and some people like snails. Except what if there was a way to make your snail do some of the cool things oysters can do, like make pearls? And what if you could make your PC do some of the cool stuff that Macs do so well? Crave is here to show you how.

Oh, and before anybody throws their Start menu out of the pram, the best way to have Mac functions is obviously to buy a Mac. But it's not that simple for roughly 90 percent of the working population, chained to ancient HP WageSlave 486s in strip-lit spreadsheet farms across the world. For them, this article is a ray of hope. And we're sure there are plenty of people out there who are perfectly happy with Windows, but even they could benefit from the nifty features we have lined up.

All this software is free, although some of them require paid upgrade to access all the features. Bear in mind, though, that they may well use up your memory and make older PCs run noticeably slower, and you download them at your own risk. Click through to see our favourite five ways--in no particular order--to make your PC more like a Mac.

Notebook online auction buying guide

There are few things in life which can be considered head-in-the-clouds experiences. The head-in-the-cloud feeling of the first kiss, the unbridled joy of winning the lottery, and the sheer excitement of unboxing your spanking new PC system.

But stop and think. Do you really want to wait for the first 12-hour charge before flicking on your notebook, only to find issues like dead pixels or faulty hardware? Can you afford waiting days or even weeks for your desktop to be delivered? Is it really worth buying the latest technology at a premium, when a last-generation system is more than enough for your needs?

Since you are buying outdated machines anyway, there is no reason to pay the extra for a new set when there are literally thousands out there auctioning off theirs for much lower, some even complete with valid warranty and in mint condition. Despite stories of fraud and scams, buying from online auctions is actually not much more dangerous than stumbling into a shady fly-by-night store selling second-hand electronics.

From choosing your system to testing your purchase, here is a three-part guide to buying a notebook off online auctions. Part one deals with how to decipher the lingo of second-hand sellers and common features of online auction sites.

Step 1: Which auction site?

Whether you go online or to a brick-and-mortar store, the very first step should be knowing what system is right for you based on your needs (note needs, not wants). Use our notebook buying guide as reference if you want. Questionable sales tactics work just as well online as in person, so do not be fooled by bait-and-switch maneuvers or tempted by the poetic descriptions of an entry-level machine seemingly fulfilling high-end expectations. Sure, a Celeron-based system with a low-end graphics card may be able to run Battlefield 2, but at such low frame rates that you feel as if your character is constantly smoking weed.

Not counting online stores--where you purchase first-hand goods--there are two main ways you can get second-hand gear from the Internet. The first is at forum classifieds, where sellers post up their products and prices which may or may not be negotiable. The second is at online auctions where the description and start price are put up, and where interested buyers start bidding up till the item is sold.

Two of the largest online auction sites, eBay and Yahoo! Auctions, have international as well as region-specific Web pages which cater to your location. If you would rather deal face-to-face at the end of the auction, choose sellers who lives in your city. The international market, however, has better deals and some of the more obscure items. A brand new LearJet anybody?

SanDisk drops prices with new flash drive

SanDisk has released a new hard drive made of flash memory, and the price won't completely break the bank.

The flash memory maker's new flash drive sports 32GB of memory and is delivered in a package the same size and shape as a 2.5-inch diameter hard drive. Earlier this year, SanDisk released a 32GB drive in a 1.8-inch diameter package. Most notebooks come with 2.5-inch drives. Typically, 1.8-inch drives are used in MP3 players.

SanDisk is selling the 2.5-inch drive for US$350 to large volume buyers. That's far more than a 32GB hard drive typically would cost. Still, it's less than SanDisk's previous 1.8-inch drive, which cost US$600 more than a conventional 32GB drive, according to SanDisk.

Chalk up the decline in price to the drastic pricing reduction experienced by the flash industry. After a few years of bounding revenues, bad news for flash makers began to crop up in August 2006, when reports showed that revenue wasn't growing as fast as in the past and that flash prices were dropping faster than expected. Supply started drifting upward while demand stabilized, and prices started dropping at 60 percent, faster than the historical norm of 42.7 percent.

Flash memory makers like SanDisk and Micron Technologies have laid out plans to make flash-based drives that will start to displace hard drives in notebooks over the next few years. Flash memory is more reliable than hard drives and can store more information in a smaller space, which will allow notebook makers to reduce the size of their computers. Flash makers produce 1.8-inch and 2.5-inch drives now so that their products will fit into existing notebooks.

Flash memory also consumes far less power than hard drives.

Unfortunately for flash manufacturers, flash also costs far more than hard drives. One gigabyte of hard drive space at retail costs less than US$0.50. A 1GB flash card probably costs close to US$20. A 1-terabyte drive at retail, which holds more than 31 times as much data as SanDisk's 32GB drive, costs US$500, or less than the SanDisk drive.

In the wholesale market, flash costs seven to eight times more than hard drives, according to some analysts.

Drive makers also point out that laptop manufacturers are putting 80GB and 120GB drives in their notebooks so users can store video and music; flash makers can't match that kind of capacity without raising the price of notebooks sky high.

Promiscuous laptops

Laptops now outsell desktops, and more and more locations are offering free public Wi-Fi networks. Yet there are no formal recommendations on how one should secure a wireless laptop on a public wireless network. Case in point: A few weeks ago, I attended the RSA Conference 2007 and shortly afterward saw a press release from AirDefense.net regarding the number of laptops--at a security conference, mind you--that weren't connecting to the official public wireless network. What's interesting is that most of the wireless laptop security information I've seen is at best vague, including some of my own tips. Here's my take on some known problems with wireless laptop security and some suggested solutions. I welcome any other tips you might have.

The threats are out there

Two years ago I wrote about "evil twin attacks", in which someone places a more powerful wireless access point close to your laptop, causing it to connect to them rather than to the intended access point. Now all your personal data is flowing through the rogue access point laptop before it accesses the Internet in what's called a man-in-the-middle attack. As I mentioned last week, there's now the possibility of mobile devices such as smart phones also conducting evil twin attacks, so we might see more of these in the near future.

Last year, WhiteHat security expert Mark Loveless, aka Simple Nomad, disclosed a problem with Windows XP wireless connections; it seems that Windows XP had a habit of broadcasting a list of known access points that it had connected to in the past. This would, theoretically, allow a criminal hacker to receive that broadcast and configure his or her rogue access point accordingly. Microsoft has since issued a partial fix, in which it turned off the broadcast portion, but maintained the internal automatic connection list. That's still a problem. If you connect at home to a router that's called Linksys, then take your laptop out in public, it will connect to the first access point it finds calling itself Linksys, criminal or otherwise.

Good behavior counts

By and large, security experts, including myself, are all on record stressing that good behavior in public places matters most. The surfing that you do online in a public wireless environment should not be what you surf at home on a much more secured wired connection. For example, don't check your bank balance online, despite what that Bank of America ad says, or type in your credit card to order flowers online while sitting in an Internet cafe.

What is considered safe are Virtual Private Networks (VPN) tunnels into a corporate environment. VPN encrypts the data back and forth, so that even if a criminal hacker were eavesdropping, they would have to first break the encryption to get the data--and who has time for that when the guy across the room isn't using VPN? But even this isn't totally secure, as criminals could capture your clear user ID, then decrypt your password access to the VPN; most companies use one of a handful of VPN services that are well-known to criminal masterminds.

Some suggestions

The problem is that Microsoft designed Windows XP and Windows Vista to be convenient, especially when connecting via wireless, but convenience in the security world often carries a high price. Of course, it goes almost without saying that you should always have a suite of security applications including antivirus, antispam, and antispyware, as well as a personal firewall installed on your laptop. But to avoid having your promiscuous laptop connect to the first access point that looks attractive, try these maneuvers:
  • Use a wireless broadband card : Rather than use a public cafe's open wireless, get a wireless broadband account and use your laptop to connect to 3G networks via cell modem. Overall wireless broadband accounts are more secure--it's harder to hack into a cellular call--and, in some cases, more reliable than public 802.11 wireless.
  • Change your home or office default router name: Don't make your laptop vulnerable in the first place. To do this, access your home or office router's firmware (usually this requires typing a specific address into a browser's address bar), then change the default SSID (Linksys, D-Link, Netgear, or the like) to something original (for example, UpUpAndBeyond, or something similar). While you're at it, change the router's default admin ID and password, and enable some form of encryption (WEP, WPA, or WPA2).
  • Disable the Windows networking automatic connect feature: Don't let your laptop connect just anywhere. To do so, right-click your current wireless network connection, click Properties, then click the Wireless Networks tab. Here you'll see a box with all of the last known connections you've made. After each, if it says "automatic", highlight and click properties, then select the connection tab for that network. Uncheck the box labeled "Connect when this network is in range". The downside is that the next time you fire up your laptop, you won't be connected right away. Instead, you should see a list of available wireless networks. It'll cost you a few seconds to choose one and connect to the right network, but at least you'll know what you're connecting to.
  • Set a MAC address for the routers you know: This won't help with random, open public wireless networks the physical address of which you won't necessarily know, but it will help with home and office connections, particularly if you live or work in a crowded area. Again, if you haven't changed your SSID, how do you know if the Linksys router you're connecting to from the front of your apartment is the one in the back of your apartment, or your neighbor's next door?
  • Turn off the ad hoc connections option: This should already be disabled with most default Windows XP and Vista installations, but you should check anyway.

Web Browser for Mac: new version of Camino

Contrary to the Web Browser Firefox who is multi platforms, Camino was developed specifically for the environment Mac OS. It uses consequently clean technologies with Mac OS X like Finder or Spotlight for the users of Tiger. Relatively functional, this OpenSource Web Browser allows inter alia navigation by tabs, the blocking of the inopportune windows (popup), the addition of extensions (or plug-ins), the protection of the private life and the management of the remote loadings. Information had us somewhat escaped, but an update 1.5.1 was published a few weeks ago.

Among the innovations and changes which it announces:
  • The update of the engine of returned Gecko towards 1.8.1.6 grinding
  • Improvement of the blocking of the inopportune windows
  • Correction of the bug involving planting at the time of a right click on certain Web pages
  • Correction of the bug involving the...
posting of the orthographical correction in the scandalmonger
  • Correction of the bug preventing the posting of appeared alarms when Camino was hidden when this one becomes again visible
For the interested people, the file of installation of 18,4 MB could be repatriated since the dedicated page.

Installation of Ubuntu - How to start

When you start your computer, a simple program, called BIOS, is given the responsibility to initialize your computer, then to give the hand to a charger of starting which deals with charging an operating system, allowing carrying out more complex tasks. The BIOS includes some summary tools to detect the presence of peripherals like the keyboard and the mouse, to check the quantity of read-write memory available and to locate various media of storage, such hard disk, the reader of CD-ROM and the disk drive.

Once these basic operations finished, the BIOS seek a charger of starting. The BIOS has a parameter indicating on which media storage to seek a charger of starting initially. Chargers of starting can be installed on the majority of the media of storage: diskette, CD-ROM, hard disk, key USB… If your computer has of a diskette containing a charger of starting, of a CD-ROM containing a charger of starting and a hard disk...

containing a charger of starting, it is advisable to specify on which media can be found the charger of starting.

A parameter of the BIOS, the order of starting (or boot order), fulfills this function. The BIOS seeks a charger on the first media specified in the list and charges this one if there is one of them; if there is not; it seeks a charger on the second media of the list. The order of starting of the more recent computers should be CD-ROM, hard disk then diskette; it is not necessarily your case, or the case of the older computers. The latter generally try to initially detect the presence of a charger of starting on the diskette - - it is for that that you finally have an error message when you start your computer while having forgotten a diskette in the reader - -, then on the hard disk on the CD-ROM.

To start CD of installation or a live CD of Ubuntu, the first media on which the BIOS should seek a charger of starting must be the CD-ROM. If you are in one of these problematic cases, there are great chances that that is due to the fact that the BIOS of your computer is configured so that it initially seeks a charger of starting on another media that the reader of CD-ROM. It is then necessary to change the order of amorage in the BIOS - - a simple, but no commonplace operation explained below.
Procedure

To Start the computer Press the button of powering of your computer, and observe well what occurs. In the first second, Bios tests your processor and your read-write memory, and says to you how you can enter the configuration of Bios to modify it. Example:
To eter setup hit Del
Enter to Bios

To enter Bios, it is generally necessary to type a key (more rarely a series of keys). Generally, it is about “F2”, “F12” or “Enter”. This key is indicated to the screen in the first second starting.
Change the order of the boot

To find the section which makes it possible to change the boot order? The interface of Bios summarizes the various orders (to enter/leave a menu, to change the value of an entry, to leave Bios by safeguarding its adjustments, etc). You will have to arrive on a line or a menu resembling of near or by far that:

It is a question here of giving to the CD-Rom (or to the reader of DVD, according to your material) a priority of boot larger than that of the hard disk.
In our example, we change the value by CD-ROM, and we allot the 2nd position to the first hard disk.
To start on CD

Generally, when you leave the configuration of Bios, the computer starts again, and you can thus check that your modifications were indeed taken into account. If all occurs well, you should fall on the reception from CD.

How to Repair Demage Photo Using ACDSee?

If from any reason you or your children damaged your photos from vacation or some special events and you think you can't save them, well you can. You can do that very easily using ACDSee Photo Manager and his tool called Photo Repair Tool. ACDSee’s Photo Repair tool combines two very powerful tools to help repair problem photos. If you are beginner and you don't know how to use this tool just fallow our steps, but first we will tell few think about additional tools which you can use.

The Clone tool copies pixels from one area of a photo to another area, creating an identical image area. This tool is more effective for photos that have strong, simple textures or uniform colors, as it is more difficult to identify the copied pixels in the finished photo.

One more very useful tool is Healing Brush Tool. The Healing Brush tool also copies pixels from one area of a photo...

to another, but it analyzes the pixels in the source area before copying them. The Healing Brush Tool also works particularly well with photos that involve complicated textures like skin or fur.

Now to repair your damaged photo using ACDSee 8 fallow next steps:

  • First you need to be in Edit Mode, on the right side of window in Edit Panel select Photo Repair,
  • Now on the Photo Repair tab select one of the fallowing options:
  1. Heal - this option copies the pixels from the source area to the target area, and blends pixels into the surrounding image area.
  2. Clone - this option only copies the pixels from the source area to the target area.
  • Now what you need to do is drag the Nib Width and Feathering sliders. In table belowe you can find additional explanations about these two options:

Nib Width Sets the width of the brush in pixels.

Feathering Sets the amount to feather on the edge of the brush to prevent sharp transitions between the original and healed part of the photo.
  • After you finish with step 3 you can continue by pressing sight click on the image to set a source location. Pixels will be copied from this location and used in the target location.
  • Now click and Drag over the area that you want to cover. If you selected the Healing Brush, ACDSee analyzes and replaces the pixels only when you release the mouse button.
  • To finish with your repairing works do one of fallowing:
  1. Click option Done to apply all changes which you did made and to return to the Viewer mode or
  2. Click option Cancel to exit the tool and cancel all changes which you did made in previous steps.


How to optimize your computer performances with 2 hard drives?

If you have two hard drives in your PC, a good means of improving the output of the principal disc (i.e. that which contains the operating system) consists in moving the files “Temporary Internet Files”, “temp” and the file of exchange (also called “Swap”) on the hard drive where Windows 2000/XP is not installed.

Attention, for this method, one speaks well about two physical hard drives and not about two partitions resulting from the same disc. By definition, one will call first disc that which contains your operating system, the second hard drive containing for example your data.

Initially, we will move the file “Temporary Internet Files”, or rather will make so that the new way of this repertory is on the second disc. For that, create a file of the same name on the second hard drive (or you want) via the explorer or the work station.

Then, open the control panel, then choose...

“Internet Option”.

Go in the “General” tab, and then click on the button “Parameters”.

In the new window which has just appeared, click on “Moving the file…”

It any more but does not remain you to show the way of the repertory than you created before

The second phase will consist in moving the file “temp”.

Here also, it is necessary to create a file with the same name on the second hard drive.

Right click on the “Work station” then “Properties” and in the “Advanced” tab click on the button “Variables of environment”.

How to test your antivirus software?

You installed an antivirus, commercial or not, and you would like to know is he well configured, that he is active and that you are well protected. It is not recommended playing with fire and visiting dangerous websites to check can your antivirus detect any kind of virus. You would indeed be likely to expose your computer at the very important risk which can go until the compromising of your computer and the loss of data.

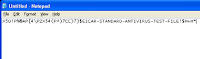
To test your antivirus in full safety, you can use the file of Eicar test. This file is detected as a virus by the antiviruses but it is not one, it does not contain any viral code. If the false virus is detected, it is that your antivirus is active and protects you.
  • To create this false virus, you need simply to create a file inside Windows. Click on the Start button, All Programs...

Accessories then on Notepad.
  • Then recopy the following character string in the Notepad:
X5O!P%@AP[4\PZX54(P^)7CC)7}$EICAR-STANDARD-ANTIVIRUS-TEST-FILE!$H+H*

  • Then save the file while clicking on File then Save as.
  • Unroll the “Save as type” list then select the option All files.
  • Add the name of file eicar.com in the zone File name. Choose the location where you want to save it (on Desktop) and then click on Save button.
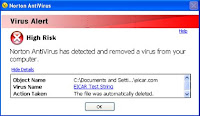
  • If your antivirus is correctly activated, it must then alert you instantaneously presence of the Eicar virus.
  • Then ask your antivirus to remove the file. In my case I had installed Norton Internet Security and file was recognize and removed automatically without any additional action from me.
If your antivirus does not see anything, than you have a problem. It could be because of two reasons: permanent protection is badly configured or there were some problems during antivirus installation. Then you have to read documentation of your software to correct this problem.

If the false virus is still not detected, you must then seriously think of changing anti-virus software.

How to convert DVD movie to videos?

More and more people want to convert DVD movies to other video formats nowadays, while there are so many kinds of video and audio formats being used widely, such as MPEG, AVI, DivX, XviD, MOV, QT(quick time), WMV, WMA, MP4, MP3 etc. The DVD conversion tools are bringing an easy way to help us backup DVD's, watch movies on portable player, download or upload video files via internet, and so on.

A general rule has been accepted in the converting market, that the more powerful functions the soft has, which means providing more output formats, the more appealing it becomes to consumers. So, our recommended product - ImTOO DVD Ripper Platinum, is the best one for you, especially DVD movie fans. It can rip and convert DVD movie and music files to such video and audio formats as MPEG , AVI, DivX, XviD, MOV...

WMV, MP4, MPEG-4, VOB, DAT, 3GP, 3G2, MP3, WMA, M4A, AAC, AC3, AU, OGG, MP2, etc. Being a powerful and easy-to-use DVD converter and ripper tool, the output quality and converting speed is perfect to comfort your needs. Don't hesitate any more, just follow what we said below, your favorite DVD movies will be easily carried out on your iPod, or PSP, or any other portable media players!

Now to convert DVD movie to videos using ImTOO DVD Ripper Platinum fallow next steps:
  • If you don't have ImTOO DVD Ripper Platinum you can buy him and install.
  • Run ImTOO DVD Ripper Platinum and Load your DVDs by clicking the "DVD" button on the interface or selecting the "Add DVD Folder" in the "File" menu.
  • Select the title or chapter you want to rip and specify the output formats by selecting an output profile in the "profile" combo-box at the bottom of the interface.
  • After specifying an output format for title or chapter, you can set the advanced setting options. The rip parameters panel on the right of the interface shows general standard parameters of the selected output format. By clicking certain setting, you may specify it, or just keep the default settings.
  • After setting everything OK, please start ripping by click the red button on the interface. All the checked chapters and titles in the list will be ripped.
Small Tips:
  • You can upload your PSP video ripped from DVD to your PSP player with the PSP video manager easily by clicking "PSP Video Manager" in the "Tools" menu.
  • Uploading the converted files to your Video iPod like what we said in the 2nd step of How to put and transfer movies to your Video iPod? If you don’t have iTunes, Please download it at: http://www.apple.com/itunes/download
  • ImTOO DVD Ripper Platinum also supports clip or segment conversion. You can convert any clip or segment by setting the start point and duration at will. The start point time format is hh:mm:ss, for example: 00:30:20. The duration time format is hh:mm:ss or s, for example: 00:00:40 or 40.
  • You can set various output formats for different files as you like.
  • You can set the preview window aspect by clicking "Preferences…" in the "Settings" menu.
  • You may adjust the offset of the DVD's subtitles in the "DVD(Global)" tab which's a part of the "Preferences…" option.
  • The operating language can be altered by clicking "Settings"⇒"Language" buttons.

How to Install the ACER ALN-320 Ethernet Fast Ethernet Adapter?

These instructions are provided as an example of how to install a PCI network adapter.

Note: if your motherboard has the VIA MVP3 Super7 chipset (e.g., the Epox EP-51MVPE-M or EP-58MVP3C-M) and is running Windows 98, We strongly recommend that you install the VIA IRQ Routing Miniport Driver before installing any network board. You should be adle to download it from the manufacture of your motherboard or, alternatively, from VIA. Determine what version of Windows your computer is running. Shut down/ turn-off your computer and unplug the power cord.

Remove the computer cover.
You "should" observe proper electrostatic precautions when handling the adapter.... Maintain contact between you body (bare skin) and the metal of the computer case or use a grounding strap while handling the adapter before it is plugged into the computer. Remove the ALN-320 from its plastic box, insert it into any available PCI bus slot, and fasten...

the top of the adapter to the case with an appropriate screw.

Plug-in your network cable.
Plug-in the computer power cord and turn it on. When Windows 95 or 98 boots up it should detect the adapter and display the following message:
"New hardware Found... AcerLAN ALN-320 10/100 Base-TX Fast Ethernet Adapter... Windows is installing the software for your new hardware"

You should then see the following window. Click OK if you do not want to fine- tune the setting. You can access and change this setting later from the Control Panel. I won't go into that here.

How to create empty file with specific size?

To create empty file with specific size fallow our next steps :
  • Open command prompt. To do that click Start-->Run... and type cmd,
  • Go to drive on which you want to create that empty file using command
  1. cd (with this command you will enter in directory),
  2. CD... (with this command you will exit from directory),
If you are in C:\Windows directory, command cd... will return you in C:\. Use command C: as much is necessary to return in root of partition. You can change partition buy typing capital of that partition (D, E, F, G, H etc.) example: if you are in partition C:\ and you want...

to go in D partition type D:
  • When you are in root of partition on which you want to create on empty file use next command: fsutil file createnew FileName Size
  • FileName is place where you can write a name of your new created file,
  • Size is place where you can write a size of you new created file. To calculate a size you can use next formula: 2 GB = 2 * 1024 = 2048 MB * 1024 = 2097152 KB * 1024 = 2147483648 bite
Example: If you want to create file and setup his size on 2GB you should type 2147483648
  • After this empty file will be created on selected partition with name and size which you did setup.
  • We recommend that you restart you computer.

How to improve sound on Video files?

  • You must use BSPlayer. Find plugin for WinAmp Enhancer017.exe (visit www.winamp.com and search plugins).
  • Install plugin in BSPlayer folder: C:\Program Files\BSPlayer\plugins\Winamp\,
  • Now, run Winamp and go to "Options > Preferences > Plug-ins" and change directory for "DSP/Effect plug-in directory" so he point to the place where you did install Enhancer,
  • Go to "Options > Preferences > Plug-ins > DSP/Effect", mark Enhancer and click on Configure,
  • Adjust "Volume 10, Harmonic Bass 5, Harmonic Bass Range 5, Drum Bass 5, Drum Bass Range 5, Dry Signal 10, Harmonic Treble 10, Harmonic Treble Range 10, Ambience off, Ambience Range 1,
  • Turn on "Power" and "Buster" (small lamp in top left corner you need to see green light if it is turn on),
  • Close all opened windows,
  • Run Winamp again and check setups,
  • Run BSPlayer and go to "Options > Preferences > Audio",
  • Turn on "Enable winamp DSP plugins",
  • Choose dsp_enh.dll,
  • If he don't exist setup Winamp plugin directory on C:\Program Files\BSPlayer\plugins\Winamp\,
  • Run any movie in BSPlayer and check is sound now strong than before,
  • If it is not try to setup sound setups while BSPlayer is open with movie,
  • After all restart your computer.
Note: These setups were checks in BSplayer 086.501 and they work great, if they work great also on your computer than you did improve sound on Video files

How to Enable UDMA66 Mode on Intel Chipsets?

If you have a computer with an Intel chipset that supports UDMA66, you will still find that UDMA66 mode is disabled by default on Windows 2000 computers. This tweak allows you to enable or disable it.
  • Click Start choose Run and type regedit to open your registry and find or create the key in step2:
  • HKEY_LOCAL_MACHINE\System\CurrentControlSet\Control\Class\{4D36E96A-E325-11CE-BFC1-08002BE10318}\0000]
  • Create a new DWORD value called "EnableUDMA66" and set it to "1" to enable UDMA66 or "0" to disable it.
  • Restart Windows for the change to take effect.
Note: Before you enable UDMA66 mode make sure that the device supports UDMA66 mode and use an 80-pin IDE cable with the proper pin cut.

How to delete file which can't be deleted from windows?

  • Click Start,
  • Choose Run and type cmd,
  • Again Choose Run and type taskmgr,
  • Go to Processes tab and find explorer.exe and turn him off (mark him and click on End Process),
  • Don't close Task Manager and go in command promt windows. Go to file which you can't delete and using commands cd for entry in file (cd program~1 or cd windows) and cd.. for exit from file (for example if we are in c:\windows\system32\ and we type cd.. you will exit in c:\windows\file)