Pages

Fujitsu LifeBook N6470 Review

Historically, Fujitsu has made some of the nicest, most well-constructed portable business notebooks around. The company's more consumer-oriented laptops are more of a mixed bag, however, offering features sets that clearly target home users but lacking the strong styling cues of some of its competitors.

In a specs sheet comparison, our 17-inch Fujitsu LifeBook N6470 review unit seems competitive enough. Of more concern is the fact that the N6470, while a solid performer in most respects, may not do enough - in terms of styling or build quality - to justify its slightly high price and entice buyers.

Full specs for the specific N6470 configuration used for this review are as follows:
  • Screen: 17-inch WXGA+ (1440x900)
  • Processor: 2.4GHz Intel Core 2 Duo T8300 (800 MHz FSB, 3MB L2 cache)
  • Hard Drive: 250GB, 4200 RPM SATA x 2 (500GB total capacity)
  • Memory: 3GB DDR2 667 MHz SDRAM (2GB + 1GB)
  • Optical Drive: Dual-Layer Multi-Format DVD-R
  • Ports and Slots: Five USB 2.0, IEEE 1394, multi-format (SD/SDHC/MMC/MS/xD) card reader, HDMI, VGA, S-Video, 10/100 Ethernet, modem, PC Card, ExpressCard, microphone in, headphone out
  • Wireless: Wi-Fi (802.11 a/b/g/n)
  • Graphics: ATI Mobility Radeon HD 2600 (256MB shared and 256MB dedicated memory)
  • Operating System: Windows Vista Home Premium
  • Dimensions: 15.8 x 11.5 x 2.0 inches (WxDxH)
  • Weight: 10.2 pounds
Styling and Design

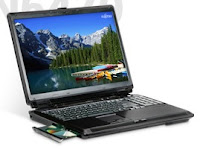
There's not a lot to say here, which may or may not be a good thing, depending on your perspective. For a comparatively expensive, high-spec notebook, this LifeBook doesn't do a lot to assert itself visually. The gray plastic (yes, it's all plastic) top vies for the most boring and empty piece of 17-inch real estate we've seen come through the office in awhile.

Opening the lid, things don't get a lot better: a glossy black plastic insert complete with wireless hard switch, volume control, and a four-way controller that can be configured to either provide multimedia controls (play, stop, etc.) or serve as a set of user-defined program "quick access" buttons suggests the N6470 as a multimedia-focused desktop replacement. The rest of the LifeBook's control surface, however, doesn't really follow through on this idea, with a bland keyboard and touchpad design.

Overall, acres and acres of monotonous gray plastic don't commit any styling atrocities, but don't do a lot to distinguish the LifeBook either.

These days, most desktop replacement notebooks include a multimedia remote - often with some sort of innovative in-body storage solution to make sure you can always find the remote when you need it. Fujitsu chose to move in another direction: make the remote so outrageously large that it becomes impossible to lose site of it.

The button layout is fine, and the remote is solid enough: it's just the size that makes it seem ridiculous, even for a notebook that's barely portable itself.

Averatec AV2575 Review

The Averatec 2575 is a thin and light 12.1" widescreen notebook that packs a dual core AMD processor, DVD burner, and super-bright WXGA screen in an ultra-portable sized package. This notebook aims to offer great entertainment and multimedia performance in a small form factor for road warriors who demand a little more from their notebooks than standard internet browsing or document typing. Read on to see if this notebook lives up to its claims, and see how it compares to other notebooks in the same category.

Our review unit of the Averatec AV2575 has the following configuration:
  • AMD Turion 64 X2 TL-64 (2.2GHz)
  • Windows Vista Home Premium 32-bit
  • 2GB DDR2-667 dual-channel RAM (2 x 1GB)
  • 250GB 5400RPM Hard Drive
  • 12.1" WXGA (1280x800) Glossy
  • ATI RS690T Integrated Graphics
  • Super Multi DVD Burner
  • Atheros AR5007EG 802.11b/g
  • Built-in 1.3 megapixel webcam and microphone
  • Ports: 3 USB, Kensington Lock Slot, LAN, Headphone/Mic, VGA, SD Card Reader, ExpressCard/54, 10/100 LAN
  • Size: 12.88 x 9 x 1.0/1.53"
  • Weight: Notebook 4lbs 0.8oz, AC Adapter 13.5oz
  • 65w AC Adapter
  • 4-Cell Battery (14.4v, 2500mAh)
  • Warranty: 1 Year standard, 6 months on battery
Build and Design

For a 12" ultraportable notebook the Avertac AV2500 series is somewhat larger than you would expect, more in line with a 13.3" notebook. Some of this size you can see around the screen bezel where there is almost an inch of space on each side of the LCD. On the keyboard side this extra space is used to make a larger keyboard than you would usually see on a 12" notebook.

Build quality is excellent, having a very rigid chassis with minimal flex. The screen frame is very strong, although it doesn't keep away all the ripples on the screen when you try to flex it or press on the back of the cover. The screen hinges gave a good amount of tension and usually required the use of two hands to open up the notebook.

The screen latching design was one element that stuck out for me, where it was the simple design that I loved. It is a latchless system that uses magnets and the hinge tension to keep the notebook lid closed. Unlike hinge tension only setups, the magnets keep the lid firmly closed, and give a satisfying click when "latched".

One area that has us concerned with the screen cover is the glossy finish did not hold up as well as we had expected, and scuffed very easily from day-to-day use. If you are looking at purcashing one of these notebooks, I would put thought into a notebook case with a soft interior to keep the screen cover perfectly glossy from day one.

First Thing Every Morning!

Would you like Excel to launch automatically when you turn on your system? Well, more specifically, we can show you how to launch Excel when you launch Windows. If you use Excel every day, you'll be saving yourself a little time and effort. To add Excel to your startup options, click Start (in the Taskbar), choose Programs, right-click Microsoft Excel, and select Copy from the context menu. Next, right-click Startup and choose Paste. Now, the next time you turn on your PC and launch Windows, Windows will automatically launch Excel

Repairing Word Installation Errors

If your copy of Word seems to have a few unexplainable bugs, a last-resort solution to your problems might be to check for installation errors. Word comes with a module for checking its own integrity.

First, shut down any other running programs, then choose Help, Detect And Repair. Click the Start button, and Word will give your installation a look to see whether it finds any problem. Be warned that this process takes at least 20 minutes to complete, so don't run the Detect And Repair option if you're in the middle of something important.

Suppress the Reading Pane for All Outlook Folders

If you're not a big fan of the Outlook Reading Pane, and wanted to know if there a way to configure it to default to no reading pane, then check this out. Normally, you have to select each folder individually to turn off this nuisance. We migrated from the previous version of Microsoft Office, where all folders had the reading pane off and no grouping. Now all folders have a reading pane and are organized in groups. We want it the other way.

Microsoft's Web site offers this painful statement: "Global changes to the Reading Pane . . . cannot be made; you must make them individually for each folder." But don't be put off by this gloomy assessment—you do have some options. For one, you can put Outlook into Safe Mode by holding the Ctrl key while you launch it. This mode suppresses the reading pane—but it also suppresses toolbars and other add-ins. What you need is a way to fine-tune the Safe Mode behavior, and you can do that by modifying the shortcut that launches Outlook.

To use this technique you have to launch Outlook from an ordinary menu or toolbar shortcut, not the special "E-mail" shortcut that Microsoft Windows XP puts at the upper left of the Start menu. Right-click the Outlook shortcut that you're going to use and choose Properties. The Target box in the dialog that appears defines the command launched by that shortcut. It will probably look like this:

"C:\Program Files\Microsoft Office\OFFICE11\OUTLOOK.EXE" /recycle

Add a space to the end of the command followed by /safe:1 and then click OK. This ­command-line switch invokes a limited version of Outlook's Safe Mode—it disables only the reading pane.

Clearing the Word Clipboard

If you're cutting and pasting repeatedly in a document, you may grow tired of seeing the Word Clipboard (which features your last 12 cuts) popping up with every paste.

To clear the contents of the Clipboard, click the Edit menu, and select Office Clipboard. Now click the Clear Clipboard button at the right of the toolbar. All your previous cuts and pastes are wiped clean. Close the toolbar and return to your work.

Always in Sight

As your worksheet grows, there comes a point where you can't see the whole thing on screen, and you lose sight of your column and row headings. This setup makes it difficult to know whether you're in the right column or row. Fortunately, the answer is simple--freeze your headings.

Select a cell just to the right of the row or just below the column that contains your headings. Choose Window, Freeze Panes. Now the rows to the left and the columns above the cell(s) you selected before freezing your headings will always remain on screen--no matter how far down or to the right you scroll. You can turn this feature off just as quickly by selecting Window, Unfreeze Panes.

Using Paste Special to Paste Unformatted Text

Word typically preserves all formatting when you cut information from a Web page and paste it into a Word document. While this is helpful a good portion of the time, sometimes it can get in the way--such as when you cut text that happens to be a hyperlink and Word 2000 inserts the link into your document.

There is a simple way to avoid pasting text with all that formatting. When you're ready to paste, simply choose Edit, Paste Special and select Unformatted Text. You'll insert the words themselves, without all that extraneous formatting.

Hiding Data

Last month we talked a bit about protecting and hiding data. However, using a sheet's Protection feature to hide data is overkill if you just want to hide a cell or two. For a quick hiding method, right-click the cell that contains data you don't want anyone else to see. Choose Format Cells from the context menu and select Custom from the Category control. Then, type three semicolons, as in

;;;

in the Type control, and click OK. Excel will hide the data in the newly formatted cell or range. However, you'll still be able to see the contents of the cell in the Formula bar.

To unhide the data, simply apply a different format.

Slam Dunk Your Text into PowerPoint

Ever have one of those presentations that comes up suddenly out of the blue and has to get done NOW? Or would you like to speed up the process of creating presentations in PowerPoint generally?

Well, here's how we've learned to cut the time it takes to get a presentation up and on its feet: Start a new presentation (File, New) and pick the design template you'd like for your presentation. Go directly to Outline View. Enter all the text for your presentation in Outline View. Start with the title for the first slide, then press Enter to go to a new line. Press Tab to indent it beneath the title and enter your text bullet points. When you finish with the last bullet point on the first slide, press Enter, then press Shift-Tab to start a new slide.

Continue this way until you've entered all the text for your presentation. If you have a slide that requires a chart or just a graphic, enter a reminder of what's needed either as the slide's title or its bullet text.

Once all the text is in place, switch to Slide view and look at each slide in the presentation (press PageDown and PageUp to switch from slide to slide). Don't make any changes yet; you're just trying to get an overall sense of how well the average amount of text you've entered per slide fits. Let's say that on average, it's a little on the long side; it's running off the bottom of a fair number of slides.

Choose View, Master, Slide Master and decrease the text size of the text placeholder box. Then choose View, Normal and check your slides again. If most of your text now fits comfortably, you can adjust any holdouts individually. The trick here is to let the Master do 90 percent of the formatting and sizing for you (so you don't have to do it manually!).

Finally, make another pass through your presentation, adding graphics and charts and any other necessary bits. Since you typed reminders to yourself in the slide text, these will be easy to find. It may seem counterintuitive to do it this way rather than entering and formatting your text on each slide, but give it a try. You'll find yourself FLYING through the process of creating new presentations.

Adding an Email Signature

As you may already know, Word provides a host of Internet functionality, including the capability to email documents directly from Word. You can even use Word to create an email signature file to be included with your messages. Start by selecting Tools, Options and clicking the General tab. Next, click Email Options and enter a name for your new signature (such as Standard Business Signature) in the line at the top of the dialog box. Enter the content of the signature itself in the larger box below (you can format the text using the formatting buttons above the box).

When you finish, click OK. Your email signature becomes an AutoText entry, and you can insert your email signature into any document by choosing Insert, AutoText, Email Signatures and clicking the desired signature.

Create a Default Presentation

Normally when you start PowerPoint, you can choose between creating a new blank presentation or a presentation based on one of the included templates. But suppose the default blank presentation is simply too boring for words (suppose? SUPPOSE? It IS too boring for words!). And further suppose that you want to base all new presentations on a template of your own design automatically. You can. Magic? No, just a matter of knowing a simple little trick: PowerPoint's "blank" presentation is actually a template file; if you create a replacement for it--one that uses your own custom formatting--it will use your template in place of the default blank presentation.

Here's how: Start PowerPoint and open a new presentation. It'll save some work if you base it on an existing template that's fairly close to what you want to end up with for your custom template. Set the defaults you want to include with each new presentation. You can set defaults for Slide Size and Orientation (File, Page Setup); color scheme; colors for fill, line, shadow, and text; text styles; the formatting for Title and Text placeholders on the Slide Master; and so on. And of course, you can include any background graphics you want on the Slide and Title Masters.

Once you've got everything just the way you want it, choose File, Save As. Select Design Template (*.pot) in the Save As Type list box. Name the presentation

Blank Presentation.pot

and click Save. PowerPoint will automatically choose the correct folder for this file, so let it; if you change the folder, it may not be able to locate and use it later.

Now close the file and choose File, New. One of the available templates in the General tab of the New Presentation dialog box will be Blank Presentation.pot. That's YOUR new Blank Presentation.pot. Choose it and enjoy your new default template.

Key Vista Shortcuts

One of the small joys of computer use is discovering a shortcut key that is so helpful you start using it every day. We've covered some of these in the past, but there are hundreds of shortcuts. Here are just a few:

Switch among applications: Windows-Tab or Alt-Tab.
Open the Start menu: Ctrl-Esc or Windows.
Go to the Quick Launch toolbar and launch a program: Ctrl-Esc, Esc, Tab, select with Arrow keys, Enter.
Minimize all open Windows and reveal the desktop: Windows-M or Windows-D.
Restore all Windows you previously minimized with Windows-M or Windows-D:
Shift-Windows-M or repeat Windows-D: Shift-Windows-M or repeat Windows-D.
Move within the Windows Desktop and select items: Tab, Arrow, Enter

The Office Assistant(s)

If you're new to Office 97, chances are you could use a helping hand now and then. Luckily for you, you may not have to look any farther than one of Office's best features - the Office Assistant.

The Office Assistant is a full-time friend assigned to keep an eye on you while you work, offering advice as needed, and even staying out of your way when its help isn't necessary. It's even smart enough to know when you're trying a feature for the first time - and it asks if you'd like help with the new task! You can activate the Assistant by clicking on the Office Assistant icon on the main toolbar - or by using the F1 key. Once loaded, the Assistant is ready to lend a hand - just double-click on it to ask it any question, in plain straightforward sentences! A right-click on the Assistant reveals choices to change Options or even Choose a new Assistant, including such noteable personalities as Power Pup, Hoverbot, William Shakespeare, Albert Einstein or the default, Clippit - the talking paperclip. Your Assistant can even be resized by grabbing and edge or corner just as you would any window.

If you didn't install the Office Assistant originally you still can. Here's how:

1 Insert the Office 97 CD and run SETUP.EXE from the CD. 2 Once Office senses it's already installed you should see a menu offering several choices including Add/Remove, Reinstall and Remove All. Click Add/Remove. 3 Scroll down to Office Tools, click it, then click Change Option. 4 Place a checkmark next to the option called Office Assistant - click OK.

What to Do When Things Go Wrong

So many things can go wrong with your computer: bad drivers, malfunctioning components, hardware conflicts, spyware invasions—the list goes on and on. Or perhaps you just can't get your software to work the way you think it should. Diagnosing the problem can be tricky, let alone fixing it once you know exactly what is wrong. Some issues can be fixed with a few blanket procedures, such as updating your drivers and operating system. Others are more complicated and will leave you wishing for some expert advice. But where can you turn for help when something goes wrong with your computer?

You can't always depend on manufacturers for help. Maybe your warranty has lapsed and you can't get support. Or maybe your PC vendor says you voided the warranty when you had the audacity to upgrade your OS. Or perhaps companies are playing a blame game: The printer vendor says the problem is with Windows, while Microsoft says the problem lies with your PC hardware.

The best thing do to is to copy down error codes and messages and then hit Google with the information. You may find that the answer to your problem is just a couple of clicks away. Tips are also a great resource and may have an answer for you.

Inside Notebooks

Notebook vendors typically choose processors, chipsets, drives, and the like from the same major suppliers. These components aren't enough to differentiate brands from one another. One Intel Core2Duo running at 2.16gHz is much like the other.

Each manufacturer has its own unique multimedia offerings, like high-gloss LCDs and media players that don't require a system boot to play movies or music. They also tout proprietary solutions for things like hard drive protection, security, physical design, and wireless options. The tricky part is deciphering which vendor has implemented better technology, especially when that "technology" might be as simple as the use of a different metal for the chassis or placing the wireless antennas in a different location.

Its not easy. The best thing you can do is go to your local super store and spend time with each model you're insterested in; and then pick the one you like the best. With similar components, the performance benefits of one over another may be negligable.

Strong Wi-Fi

Having a wireless network in your home or office is great. You can check your e-mail in bed and work from the living room with the ball game on TV. You're also no longer chained to your desk. You can take your laptop to a meeting and stay connected to your network and the Internet. What happens, however, when your signal doesn't extend to the kitchen, or to the last few offices in your corridor?

We lost our wireless connection less than 50 linear feet from the access point in a wood-frame house. Many wireless users have similar complaints. Wi-Fi, officially known as the 802.11b standard, is supposed to be better than that. But vendors invoke very broad caveats because of the many causes of dead zones in a Wi-Fi network. Many buildings have structural elements that can block radio transmissions, including Wi-Fi. Even passing through wood and drywall may limit the power of your access point's signal. In addition, Wi-Fi uses the same basic radio technology as 2.4-GHz cordless phones. Such phones, and especially their base stations, can cause interference. If you have a phone base and a wireless AP, keep them as far apart as you can.

Microwave ovens are another major source of Wi-Fi interference. These devices throw out enough radio waves in the Wi-Fi range to make communications unreliable within a few feet of a microwave. But interference occurs only when the microwave is in use, and it usually extends no farther than 10 feet from the oven.

How to Migrate to a New PC

You probably know the feeling: You sit down at a new computer, excited by its potential, only to realize that so much of what you really need is still stuck on your older system. Trading up to a new PC and a new operating system can be a bit like moving into a newer, bigger house; you've got to pack up and relocate every little thing you've amassed over the years, and then customize your new surroundings before it really feels like you're at home. But how are you going to transfer your address book, e-mails, data files, Internet favorites, digital music and photos, specialized applications, desktop wallpaper and screen savers, and all your other personal paraphernalia, not to mention your application and system settings?

Copying all this data manually is an option in principle, but it's hopelessly tedious and error-prone in practice. You're likely to miss files hidden in some dark corner of your hard drive—and even if you do succeed in copying all your data files, you've still solved only part of the problem. Many Microsoft Windows applications store key settings in the Registry or in profile files. If your new PC has a newer operating system or newer versions of applications, the older settings may have moved or not be applicable at all. Copying your hard-drive contents wholesale isn't an option, either, since a new operating system and new underlying hardware will require all kinds of different files that you don't want to risk overwriting.

FTP Folders

Rich File Transfer Protocol (FTP) folders on the Internet now appear with the same look and richness of folders as those on a user’s hard drive. This provides users with a seamless look across local data and data on the Internet.

To access FTP sites directly using IE5:

In the Address bar, type the Internet address (URL) for the FTP site you want to connect to. For example: ftp://ftp.microsoft.com/ To download a file or folder, right-click the item on the page, and then click Download To. To log on as a different user to this FTP site, click the File menu, and then click Login As. To rename or delete items in an FTP folder, or paste items into an FTP site (upload), you can use the same commands and actions you use with Windows Explorer or My Computer. Notes: On some FTP sites, you can only view or download files. Only the people who run or own the site can rename, delete, or upload files. On many FTP sites, you are automatically logged on anonymously, so you can view or download files. To upload, rename, or delete files, you may need to log on using a special username and password. Also, different areas of the same site may require different logons. You cannot move files within or between FTP sites. You can move files from an FTP site to a temporary location on your computer or a network drive and then upload them to another FTP site or different folder on the same site. Some programs may support opening and saving files from FTP servers by typing an FTP address in the File, Open or File, Save dialog box.

Sound Cards

Sound cards perform two functions. First they take digital information and turn it into sound, outputting the sound through speakers. Second, they take sound that is input through a microphone and turn it into digital data. Sound cards are well named; they are cards that deal with sound.

In order to play and record sounds, a sound card needs to connect to at least a set of speakers and a microphone. Virtually all sound cards have four sockets for miniature audio jacks: microphone, speaker, line in, and line out. Many sound cards will also have a female 15-pin DB socket that allows you to directly connect to electronic musical instruments.

The microphone and speaker sockets are for connecting to a microphone and speakers. Line in allows a sound card to record from a stereo, tape recorder, etc, and line out allows the sound card to output to those same type of devices. On most systems, only the speaker and microphone sockets are used. Most PCs also have a small cable running between the sound card and the CD-ROM drive, which allows the CD-ROM drive to play audio CD-ROMs through the sound card, in essence turning your PC into a stereo system.

PC Cards (PCMCIA)

In an effort to give laptop and notebook computers the kind of expandability that users have grown used to in desktop systems, the Personal Computer Memory Card International Association (PCMCIA) has established several standards for credit card-size expansion boards that fit into a small slot on laptops and notebooks. The development of the PC Card interface is one of the few successful feats of hardware standardization in a market full of proprietary designs.

The PC Card standards, which were developed by a consortium of more than 300 manufacturers (including IBM, Toshiba, and Apple), have been touted as being a revolutionary advancement in mobile computing. PC Card laptop and notebook slots enable you to add memory expansion cards, fax/modems, SCSI adapters, network interface adapters, and many other types of devices. If your computer has PC Card slots that conform to the standard developed by the PCMCIA, you can insert any type of PC Card (built to the same standard) into your machine and expect it to be recognized and usable.

The promise of PC Card technology is enormous. There are not only memory expansion cards, tiny hard drives, and wireless modems, but also ISDN adapters, MPEG decoders, network interface adapters, sound cards, CD-ROM controllers, and even GPS systems that use global positioning satellites to locate your exact position on the earth.

Originally designed as a standard interface for memory cards, the PCMCIA document defines both the PC Card hardware and the software support architecture used to run it. The PC Cards defined in version 1 of the standard, called Type I, are credit card size (3.4x2.1 inches) and 3.3mm thick. The standard has since been revised to support cards with many other functions. The third version, called PC Card Specification -- February 1995, defines three types of cards; the only difference between each one is their thickness. This was done to support the hardware for different card functions.

Most of the PC Cards on the market today, such as modems and network interface adapters, are 5mm thick Type II devices. Type III cards are 10.5mm thick and are typically used for PC Card hard drives. All of the card types are backwards compatible; you can insert a Type I card into a Type II or Type III slot. The standard PC Card slot configuration for portable computers is two Type II slots, with one on top of the other. This way, a single Type III card can be inserted, taking up both slots but using only one of the connectors.

For more information on the PCMCIA standard, check out http://www.pc-card.com.

Plug and Play

Plug and Play is an independent set of computer architecture specifications that hardware manufacturers use to produce computer devices that can be configured with no user intervention. When you install a device, you do not need to know its Plug and Play requirements, because they will be set automatically.

You can install hot-pluggable Plug and Play-compliant devices simply by plugging in the device. For other devices, such as Plug and Play Industry Standard Architecture (ISA) cards, you must plug in or install a device while the computer is off and then turn the computer back on to initialize the device.

For example, a user can do the following:
  • Insert and remove such Plug and Play-compliant devices as PC Cards without having to configure them.
  • Connect to or disconnect from a docking station or network without restarting the computer or changing configuration parameters.
  • Add a new monitor by plugging it in and turning it on.
Windows 95-98 can detect the presence of a Plug and Play-compliant device. This is known as enumerating the device. After enumeration, the device driver can be configured and then loaded dynamically, requiring little or no user input. Certain buses (for example, peripheral component interconnect [PCI] and Universal Serial Bus [USB]) are also automatically enumerated; these buses take full advantage of Plug and Play capability.

Tips Power Supplies

The basic function of the power supply is to convert the type of electrical power available at the wall socket to that which is usable by the computer circuitry. The power supply in a conventional desktop system is designed to convert the 120-volt, 60Hz, AC current into something the computer can use, specifically, +5v and +12v DC current, and +3.3v as well on some systems. Usually, the digital electronic components and circuits in the system (motherboard, adapter cards, and disk drive logic boards) use the 3.3v or +5v power, and the motors (disk drive motors and any fans) use the +12v power. The power supply must ensure a good, steady supply of DC current so that the system can operate properly.

Power supplies are rated in watts. A PC requires sufficient wattage for the machine to run properly. The average desktop PC with two hard drives and a CD-ROM drive will need an average of 115 to 130 watts while running, and up to 200 watts when booting up. Play it safe and buy 200-230 watt power supplies. They are by far the most common wattage, and will give you plenty of extra power for booting up, as well additional functionality in the future.

Power supplies are available in a variety of shapes and sizes. Although the sizes are very standard, the names for the sizes are not. For most desktop or mini-tower PCs, the power supply is an "AT mini' power supply in the 200-250 watt rating. To save time and repeat visits to your friendly neighborhood electronics shop, do yourself a favor: remove the suspect power supply and take it in with you to guarantee that you choose the correct replacement.

The Binary Number system

Since so much about computers involves binary numbers, we thought we'd take a minute and explain exactly how binary numbers work.

First of all, and contrary to popular opinion, computers are dumber than doorknobs. All they are, are machines for crunching numbers, and in this case nothing more than two values, zeroes and ones. Each value is considered a bit, and eight bits makes up one byte. Computers make use of switches, much like the earliest transistors, to take these zeroes and ones, and send them down a particular path (or gate) depending ontheir value. Modern day computers contain millions of these switches, most located on the CPU, and their values (data) can travel across huge, multi-lane highways called busses. Most busses today are 32-bit, like a 32-lane highway, each lane containing continuous streams of data bits.

OK, so what does this have to do with the binary number system? Plenty, because binary numbers are perfectly suited for this type of data transmission since they themselves are comprised totally of only zeroes and ones. Binary as the name suggests is a numbering system based on powers of two (n2).

Here's a typical 8-bit Binary Value shown with it's respective Actual Numeric Values:

Binary Value = Actual Numeric Value

1 = 128
0 = 64
1 = 32
1 = 16
0 = 8
1 = 4
0 = 2
1 = 1

The 8-bit Binary value is shown as 10110101 and it's actual numeric value equals 181.

See how it was done? Look at it this way, in binary, a 0 represents "no" or "off" (the absence of a value) while a 1 represents "yes" or "on" (the presence of a value). Another description might be 0 = "false" and 1 = "true". You get the idea. For the example above, the numeric value was obtained by simple addition (128 + 32 + 16 + 4 + 1 = 181).

Binary values can be read right-to-left, starting with a value of 1, while each value to the left of that doubles sequentially. Using this system, you can create any number, limited only by the number of places you use, in this case eight.

If every value in the 8-bit binary example was a 0, the numeric value would be 0 as well. If every value in the 8-bit binary example was a 1, the numeric value would be 255. Counting 0, an 8-bit binary value gives you a total of 256 possible numeric values.

Here's another example using a 16-bit Binary Value:

Binary = Numeric

1 = 32768
0 = 16348
1 = 8192
1 = 4096
0 = 2048
1 = 1024
0 = 512
1 = 256
1 = 128
0 = 64
1 = 32
1 = 16
0 = 8
1 = 4
0 = 2
1 = 1

The 8-bit Binary value is shown as 1011010110110101 and it's actual numeric value equals 46517.

If every value in the 16-bit binary example was a 0, the numeric value would be 0 as well. If every value in the 16-bit binary example was a 1, the numeric value would be 65536. Counting 0, a 16-bit binary value gives you a total of 65537 possible numeric values.

Do some of these values sound familiar? They should, how about 32-bit, 64 Mbs of RAM, 256 colors, 512 Kb cache?

As you can see, using the binary method some very large numbers can be handled very quickly by the CPU using only two digits, and those numbers increase exponentially every time another place is added.

SCSI Adapters and Drives

Unlike IDE devives, you have to work a bit harder to install a SCSI subsystem. Each SCSI subsystem consists of a SCSI adapter (also called a SCSI host bus adapter), one or more SCSI devices, and a series of cables that connect the adapter and devices in a daisy chain conliguration. There are a fair number of rules, but they are pretty easy to follow:
  • SCS1 is configured as a bus, and each device on the bus must be assigned a unique address ranging from 0 through 7. (Wide SCSI buses can support addresses ranging from 0 through 15; consult the documentation tor your SCSI adapter.)
  • The SCSI adapter will always be assigned address 7, which is the factory default.
  • Most SCSI adapters expect device 0 to be the hard drive that boots the system. Adapters also might expect drive 1 to be a hard drive. If that is the case, don't assign address 0 or 1 to other types of devices.
  • Lower-numbered SCSI addresses have higher priorities. If your machine has hard drives and a CD-ROM, assign the hard drives to the lower addresses.
  • A system can support up to four SCSI adapters. You must, of course, insure that each adapter is assigned unique settings for interrupts, memory, and so on.
  • Some SCSI adapters are equipped with floppy drive connectors. If your floppy drives are attached to other controllers (such as the controllers built into most current motherboards), be sure to disable floppy drive support on the SCSI adapter.
  • You add devices to the SCSI bus by daisy chaining cables from device to device.
  • The first and last devices in the SCSI daisy chain must be terminated*.
  • Devices in the middle of the daisy chain must not be terminated.
  • External SCSI devices must be separated by at least .3 meters of cable.
  • The total length of the SCSI cable daisy chain cannot exceed 6 meters.
  • At least one device must supply power to the SCSI bus. In most cases, this will be the SCSI adapter. All devices are protected by diodes, so it doesn't matter if more than one device is supplyng power to the bus.
SCSI Addressing SCSI is an attractive technology because one controller can manage seven devices (or more with Wide SCSI). Each device is identified on the SCSI bus by a unique SCSI address. Several precautions were mentioned in the preceding list.

A PC can support four SCSI buses, and devices on separate buses can share the same address. You must, of course, find distinct IRQ and other required settings for each SCSI bus adapter. The addresses on internal devices are usually set with jumpers. Many external devices are equipped with switches that make it easy to set the addresses.

A few new SCSI devices are being equipped with a SCSI Plug and Play feature that enables them to be configured with a SCSI address automatically. Plug and Play devices can coexist on the same bus with standard SCSI devices.

*Note: Whenever you have a SCSI adapter connected to ONLY internal or ONLY external devices, but not BOTH, the adapter itself is considered to be the "end of the line", and therefore it must be terminated.

IDE Drives

Most PC's today use IDE (Integrated Drive Electronics) or EIDE (Enhanced Integrated Drive Electronics) hard drives and CD-ROM drives. IDE drives are generally very easy to install. Most new PC motherboards are equipped with an IDE connector and most newer boards have two.

If your system includes only one IDE controller, the addresses are preset and standard. The I/O address for the first controller is always 1FE hex, and the interrupt is always 14.

If you need more than two IDE drives, you can include a second IDE controller if one is not present on your motherboard. IDE controllers are available for ISA, VESA, and PCI slots. The address for the second controller is usually 170 hex. You will need to determine an available interrupt.

Each IDE drive must be configured as a master or a slave, which is usually done by setting jumpers. The first drive always is configured as a master and is seen by your system as Drive C. If you add a second drive, set its jumpers to the slave setting.

A single ribbon cable with two drive connectors supports both the master and slave drives. Drives can be connected to the cable in any order. However, be sure that line 1 of the ribbon cable attaches to pin 1 of the drive connector. Line 1 usually is identified by a colored stripe along one edge of the cable.

Note: The example shown below represents only one possible jumper configuration, be sure and check your manufacturer's documentation for instructions on setting up master and slave jumpers.

Motherboards - A General Description

The motherboard is like a car chassis. In a car, everything is connected to the chassis either directly or indirectly. In a PC everything is connectedto the motherboard, either directly or indirectly. A motherboard is a thin, flat piece of circuit board, usually of green or gold color, usually not much larger than an 8.5" x 11" piece of paper.

A motherboard has a number of special sockets that accept various PC components. There are sockets for the microprocessor, sockets for RAM, sockets to provide power, connectors for floppy drives and hard drives, and connectors for external devices such as mice, printers, joysticks, and keyboards. A few components are soldered directly to the motherboard. Between the various devices, the motherboard is filled with tiny wires, called 'traces," which electrically link the various components of the PC together.

All motherboards also have multipurpose expansion slots that allow the addition of optional components. There are thousands of different types of optional devices that can be added to a PC, including scanners, modems, network cards, sound cards, and tape backups. The expansion slots allow optional devices to communicate with the PC. The device that connects to the expansion slot is generically called an expansion card, an adapter card or just a card. There are different types of expansion slots for different types of cards.

The position of the expansion slots and external components is very standardized. They have to be. The motherboard is mounted to the box or case, the part of the PC that you actually see. The box needs to have holes that allow devices to access the external connectors. For example, if the motherboard has a connector for a keyboard, there needs to be a hole in the box though which the keyboard plug can be inserted.

Equally important, if the expansion slots allow you to add cards to the PC, then there must also be holes that allow different devices to connect to their cards. Clearly, there must be a certain type of box to go with a certain type, or layout, of motherboard. Fortunately, there are very few different layouts of motherboard, requiring only a few different types of boxes. There will be much more on motherboards covered later.

For more information, check out these pages from some of the top manufacturers:
Abit | Asus | Intel | Micronics | Tyan

While you're out surfing, no web search for motherboard information would be complete without a visit to Tom's Hardware Guide.

Microsoft Intellimouse

Every once in a while, a hardware innovation comes along that completely redefines the standard. Enter the Microsoft Intellimouse. While at first, it still looks like any ordinary mouse, the first difference you'll see is that wheel sticking out between the buttons. And it's that wheel, coupled with the bundled Intellipoint software, that makes all the difference in the world. It's one of those things that once you've tried it, you wonder how you managed to get along all this time without it. The wheel is amazing, with it you can:
  • Scroll through any page easily - Save time and steps. Simply roll the wheel forward or backward instead of clicking on a scroll bar or arrow.
  • Work hands-free with AutoScroll - Press the wheel, set the scroll speed, then watch your document scroll automatically.
  • Zoom efficiently - Use the wheel to see either close-up or big-picture views without having to use menus or toolbars (in compatible applications).
The Intellipoint software not only gives you the usual suite of mouse utilities, but it also gives you complete control over the wheel and it's behavior. The wheel (which can also be clicked like a third button) can be configured to Open Explorer, Open Help, Open the Start Menu or act like a double-click.

Take a closer look at the Intellimouse and even try out a few interactive demos at http://www.microsoft.com/products/hardware/mouse/intellimouse/

Note: Free Driver Update
If you currently have IntelliPoint 1.1 or later installed you'll be glad to know Microsoft has just released the latest version of their Intellimouse Drivers, Version 2.2d.

You can download the latest version free of charge at http://www.microsoft.com/intellipoint/. The latest driver allows you to scroll with the IntelliMouse®wheel in Windows® 98, Windows® 95 and Windows NT® 4.0 compatible applications.

File & Folder Encryption

There are sensitive data that have to be protected from unauthorized access and reading on almost every computer. In companies, this includes internal, confidential information like management analyses, research results, and personnel documents.

In a private environment, it is “only” the user’s personal data and documents that have to be protected from access and manipulation by other PC users. Lists with PIN numbers, social security numbers, documents for tax returns, or the user’s resume should not be used or changed by anyone else, even one’s own children.

For both business and personal information, the loss of trust or the possible financial damage is immensely high. A basic protection against such risks is the “Secure Virtual Disk” technology with the simultaneous protection of several files in a virtually created drive. It creates an “electronic safe” on a computer to protect the valuable electronic data (e-assets).

The Secure Virtual Disk technology of SafeGuard PrivateDisk combines the advantages of both file and disk encryption:
  • Automatic encryption (high transparency)
  • All contents and additional information like file name, file size, and author are encrypted
  • The data are protected during transmission
  • Confidential data can be secured without the need to encrypt an entire hard disk or partition
  • For users, there is no difference between the use of a virtual disk and a regular drive

Tips for successful Data Leakage Prevention

Requirements analysis is indispensable

A viable export monitoring policy based on a DLP product requires careful analysis of requirements. And these requirements can vary greatly within departments. Whereas in Customer Support a crucial role is played by keywords and regular expressions such as "Client Number", one of the important terms in Engineering is "Fingerprinting" in the context of technical documents or source codes.

Minimizing false positives

DLP is not an exact science. That applies both to content analysis and to export monitoring. False positives frequently present a threat in the area of content analysis as a result of ambiguities with keywords. For example, the word "job" has an entirely different meaning in HR (employment) than in the technical area (action or activity). Clear company rules have to be defined in this context.

Export monitoring is not enough

Export monitoring alone does not protect against IT specialists among the internal perpetrators. For example, a text that has been disguised using the ROT-13 algorithm popular with Usenet newsreaders can be picked out really easily using common DLP products. The principle is as follows: ROT-13 shifts the alphabet by 13 characters. The message is later revealed, for example, by means of add-ons in popular e-mail programs (such as Thunderbird from Mozilla).


Avoid instant messengers

Problems with data leakage protection often occur via secure export channels on the terminal, such as by means of instant messengers (ICQ, Yahoo Messenger, MSN Messenger). Vendors of DLP products can often only react to the current messenger releases at the time, and offer support for a coming version of DLP solutions. For that reason, administrators should forbid the use of such programs within the company.

Explain the situation to employees

The introduction of a comprehensive DLP solution requires the inclusion and involvement of the company's employees. A soft touch is usually more effective during the implementation stage than harsh measures against the misuse of data. The latter approach often leads to employees simply ignoring the guidelines.

Keep calm – even during an alert

Not every infringement of DLP precautions should inevitably lead to an alert or to sanctions. Occasionally, a confidential document is exported with legitimate intentions. An ID card number may, for example, just be a jumbled telephone number. It is advisable to weight matches within the individual categories (keywords, regular expressions, similarities), to add up the coincidences with the corresponding factor, and to trigger a sanction only when a definable threshold figure is reached.

Correct sanctions

If an unauthorized export of a confidential document is detected there will be appropriate sanctions, depending on set policy guidelines. These sanctions may include logging the operation to give administrators an overview of the current security situation in the company. Certain operations may also be blocked. One of the intelligent variations involves an interactive dialogue with the user: The system points out any security reservations to the user by means of a dialogue, and asks the user to enter a justification for the export.

Tips for removable media

Make employees aware

Many users are not even aware of the dangers caused by removable media. For this reason it is very important to explain the right way to use mobile memory media. Experience shows that having well-trained employees reduces the risk of data loss and the danger of unknowingly importing files and applications into the IT infrastructure.

Identify device types

USB, FireWire, Bluetooth – the paths over which PCs interact with portable peripheral devices are becoming ever more varied. When systems are being made secure against data misuse, the connection type or connection itself is irrelevant. What is much more important is being in control of the type of device used and the data exchanged with it.

Carry out access control

Trust is good, control is better: professional software supports this task. Comprehensive functions enable administrators to implement internal security guidelines centrally. Using them, they can prevent access to individual Plug and Play devices or entire device classes. Alternatively they can permit particular users or devices. Using access mechanisms with high levels of differentiation they can also define read and control write accesses and access rights to different applications. In this way a company can clamp down on the private use of mobile memory media while still permitting them to be used for business purposes.

Exclude viruses

Access control also protects the system against viruses. If data in a company can only be downloaded onto mobile removable media but not uploaded, then there is also no danger that worms and viruses might get transferred onto a company hard disk and consequently into the corporate environment.

Implement encryption

It makes good sense to implement a data encryption system with a centrally predefined company or user key to prevent the misuse of information that is saved on a removal storage medium. The data will still be usable everywhere within the company, but cannot be viewed or used on a computer outside the company. Encryption also brings security if mobile memory devices are lost or stolen – because the smaller the products are, the greater the danger that they will go missing.

Restrict plug and play

Plug and Play is convenient, but it can sometimes be dangerous: if someone connects a USB stick, MP3 player, or external hard disk drive to a notebook, it is recognized automatically – and it is then easy to start exporting data and passing it on to the wrong people. The alternative is to lock the computer, so all memory media except for the company's own memory sticks cannot be used to run or read programs. This also removes the danger of accidentally loading a worm or virus on your own hard disk if you lend the data medium to someone and get it back with a "dangerous cargo." In addition, you should only use sensitive data on USB sticks when it is encrypted, as the smaller the memory device, the greater the danger that it will get lost or stolen.

Implement automatic encryption

What use is the best safe, if the valuable data is simply left on the shelf next to it because no one takes the time to think about whether a particular document needs protecting at all? Here, transparent data encryption is a big help: It runs automatically in the background, without being noticed, so the user does not even have to think about storing data securely.

Set up an electronic safe

Much like keeping important papers in safes, you should never save valuable information without protecting it electronically: The electronic pendant is a “virtual” disk drive that securely encrypts and stores all of its contents. You can easily set up an electronic safe of this kind on local hard disks and network directories, on PDAs, and on mobile media such as USB sticks and flash memory cards, CD-ROMs, DVDs, and diskettes to provide secure storage of your electronic data.

Secure standby mode

You can set up the system to prompt for the password again when the notebook switches back from screen saver or hibernation mode to normal working mode. This means your data is still secure if you stop for a break or you are making a phone call in the train or airport.

Supplement password protection

Analysts working for the Meta Group have confirmed what IT managers already know: passwords alone do not provide optimum protection for data. The alternatives have been available, and in use, for years: special smartcards or tokens – which look just like a USB stick – store key information that is used in combination with a user password to unlock the computer. Only someone who has the token and knows the password can access the system and the data saved on it.

A variant becoming more common and which is a bit more expensive is to store the user’s biometric data on a smartcard. For authentication, the user’s fingerprint is checked directly on the card instead of using a password.

Making passwords more difficult to crack

If the worst happens and your computer is stolen or lost, there is still hope that your personal data is not accessible if the password is difficult to crack. A mixture of, numbers, letters, and symbols is considered the most secure – but only if passwords and keys are not stored on the hard disk. For this reason it is better if the computer prompts for a password before booting – electronic security solutions enable this. This makes it very difficult for an unauthorized user to access the operating system or saved data.

Discipline when on the move

The only protection against being careless is more care and discipline – but that is difficult when you are under time pressure. A survey of the lost and found offices in the German cities of Berlin, Frankfurt, Hamburg, and Munich found that more than 25 notebooks were turned in to them in the first half of 2004 alone. This might sound obvious, but if you travel with a notebook, you should always make sure that you really have the notebook case, including all of its contents, over your shoulder before you leave the plane, taxi, or train.

Yep PDF Converter for Mac Review

After distribute being distributed in free version Beta, Yep became a shareware. The object of this software is to manage PDF documents like the photographs in iPhoto, i.e. using a navigator. PDF files are thus accessible by keyword, via albums, intelligent or not. An innovation of this version 1.6.4 is the automatic importation of PDF files: for this purpose the hard disk is raked systematically. Moreover, associated a scanner, Yep can manage the digitalization of the documents. To note the regularity of the updates of the application who are as much of occasion of correction of bugs and contribution of new functionalities.

Yep Interface

The interface evokes iPhoto. It is made up of a central part posting the labels (with adjustable size) of PDF documents, of a left-hand column making it possible to manage the organization of the documents in album and of a right part describing to most completely possible it (S) document (S) posted (S).

The left-hand column can cover several employments. Instead of the organization in album, it can post the keywords or a browser files of your discs. It is then possible to directly move PDF documents of a file to another by simple “slip-depositing”. The central part cl
assically posts the labels of the first page of PDF document, but can also present the documents in the form of list. Posted information is of course modifiable thanks to the headings of columns.

It is also this central part which is transformed into visualisor. In a way similar to iPhoto and his editor of image, the visualisor allows to send the PDF by email directly, to print it, to make him undergo a rotation or to post it in full screen.

User has from now on faculty to choose the page which will hold place of miniature. It is a pity however which this functionality is dissimulated in the menus, and not directly accessible via a small icon. A second regret is due to impossibility of enriching the document by textual comments. As for the right part, it posts, with the manner of information of Finder, all information available on the document.

PDF Importation

Yep does not import any more documents in its repertories but indexes the entirety of the hard disk to starting (similar to most photo software’s like Picasa or ACDSee for Windows). As example, one needed 1 minute for the first opening to gather 1600 PDF files on an occupied hard disk to a total value of 120 GB.


Fortunately it is possible to choose the repertories to be explored, and, better still, those to avoid! It would have been welcome to be able to preserve its configurations, and to have in addition the possibility of activating the scan. But it is possible via Yep to easily generate new PDF documents:

1. Associated a scanner, Yep can digitize a document directly.
2. Quite practical Function for those which do not have a scanner but a numerical camera, Yep can generate a PDF document starting from an image. Keywords could then be added to structure filing. This functionality, disappeared with version 1.5, and is reappeared with pleasure with version 1.6.1!

Our final impression about Yep for Mac

Yep item adds one “Save PDF to Yep” to the small PDF of the dialogue of impression Mac OS X. Thus Yep generates a PDF document which it places in its repertory of importation. This last is organized hierarchically by date. Its localization is from now on configurable by the preferences.

Innovation: YepShot. You can activate this option, which adds simply a bookmark to your preferred navigator. Then, during the navigation and of the choice of this bookmark, Yep produces a PDF document then, and adds to him automatically like key words, the terms selected in the page. Good idea… but the generation of page is not optimal, and the quality of the produced document depends much on the complexity of the page.

Parallels Desktop for Mac Review

In the first issue we decided to make a brief description of Parallels, Inc and its products. Parallels, Inc. is a privately held, fast-growing software company based in Renton, Washington that is entirely focused on developing industry-leading workstation and server virtualization technologies. The Parallels team is one of the most mature in the industry. Core team members have been involved in software development, testing, and deployment since 1995, and have been entirely focused on virtualization technologies since 1999. The 1980s and 1990s saw enterprises worldwide invested hundreds of billions of dollars into creating complex, underused IT environments that were unable to cope with constantly changing needs and a perpetually evolving business climate.

The only available solution in a “traditional” IT infrastructure is to upgrade existing workstations and servers, or add additional hardware to accommodate new requirements. This “buy and try” approach results in monstrous, resource-hungry environments that include disparate operating systems, hardware standards, and applications. Through the development of ground-breaking virtualization solutions for both servers and workstations, Parallels is helping to alleviate the cost and headache associated with a traditional IT infrastructure. Virtual IT infrastructures help enterprises lower operating costs, improve user productivity, and maximize hardware value by reducing the total number of machines needed to complete critical tasks. With fewer machines in operation, enterprises save time, energy costs, and can make more efficient use of physical space, existing hardware, and support team efforts. They produce the award-winning and industry leading virtualization software that is acknowledged worldwide to be the most convenient, reliable and easy-to-use virtualization software in the industry.

Now let us start with Parallels Desktop for Mac Review.

Parallels Desktop for Mac is the first solution for Intel-Macs that give you the flexibility of running Windows on a Mac OS X simultaneously without rebooting. You can use Parallels Desktop for Mac on any Intel-powered iMac, Mac Mini, MacBook, MacBook Pro, & Mac Pro Towers. Now you can take advantage of important Windows-only software applications like Internet Explorer, Microsoft Outlook, Microsoft Project, Quicken, Microsoft Visio, Microsoft SharePoint, SQL Server, and more, without giving up the security, comfort and functionality of your Mac!

Parallels Desktop for Mac is the main and top-selling product for Parallels. For many Mac users, running Windows applications is a necessity. There was a problem with other virtual machines working with Mac, because they didn’t allow working simultaneously with Windows on Mac, there was only an opportunity to move between the OSes by rebooting the PC. Of course, that was inconvenient for users.

That’s why Desktop for Mac is so popular in Mac-users community. By using this software Mac-users got the ability to work with Windows and use Windows applications on Mac without rebooting. Desktop gives the ability to support a great amount of operating systems, including such popular as Windows Vista and Mac OS X 10.5, code-named “Leopard”. Desktop for Mac is the only solution that automatically takes full advantage of Intel Core Duo Virtualization Technology which allows you to run Windows and its applications at full speed.

Parallels Desktop for Mac received many famous awards: Macworld – “Editor’s choice”, MacUser 06 Awards – “Innovation of the year”, "Best of Show" at the 2007 MacWorld Expo, PC World - one of the 20 Most Innovative Products of 2006, one of the Washington Times' "Best Tech Products of 2006" and many others.

Windows & Parallels Desktop for Mac

Installing Windows XP or Windows Vista inside of Parallels is downright easy and problem free. With Windows Vista in particular and the Express Installation mode there were only a handful of boxes to click before Vista was completely installed.

Actually using Windows within Parallels feels no different than using Windows on a standalone computer, albeit with one minor caveat. Compared with previous versions Parallels made a big change, now Desktop 3.0 for Mac supports 3D graphics and you will be in possibility to play video games. Personally, I don’t play games or use any 3d rendering programs so this caveat did not bother me much. It would have been nice to have the Aero features available in Vista but this really didn’t affect my productivity in any appreciable way. Other than that, all the Windows programs you normally use can be used with Windows & Parallels. Parallels does offer three distinct viewing modes when working with the guest Windows operating system: Window, Full screen, or Coherence modes. Using the window mode is probably the most familiar method, but on my 13″ MacBook that would have been the least desirable method out of the three. In full screen mode, it really does feel like you are running Windows on a PC.

Linux & Parallels Desktop for Mac

Parallels had no problem installing Ubuntu’s Edgy Eft. If you have never used Linux before, Parallels is a great way to get your feet wet with Linux but not having to completely commit yourself to the alternative operating system. Although Parallels doesn’t feature all the bells and whistles for Linux guest operating systems as they do for Windows, nevertheless Parallels ran Linux great.

One of the first things that I wanted to change was the default aspect ratio. On my Macbook with its native resolution of 1280×800, the available resolutions were 1024×768 (height was to tall) or 800×600 (width was to small), which were not ideal for my needs. In order to change the resolution two steps were needed. In the “Configuration Editor” I selected “Video” then clicked the “Enable custom screen resolutions” box and then added 1024×600. Next step was to boot up Ubuntu. Then add custom settings in xorg.conf. Under the “Screen” section next to “Depth 24″ I added “1024×600” and then under the “Monitor” section I added this line :

# 1024×600 @ 60.00 Hz (GTF) hsync: 37.32 kHz; pclk: 48.96 MHz Modeline “1024×600_60.00″ 48.96 1024 1064 1168 1312 600 601 604 622 -HSync +Vsync

From there things worked quite nicely, but as I said before, you don’t get all the features that are available for Windows guest operating systems. I was surprised that Parallels did not have a “Shared Folders” option available for Linux. Since I have used VMware in the past on my Linux desktop (as the host OS) and they have shared folders available for Linux I thought it was strange you could not do the same for Parallels and Linux. Needless to say that was disappointing. Nonetheless, I was able to share folders between OS X and Ubuntu via NFS.

Final Conclusions

Parallels Desktop for Mac has come along very nicely in only a short of amount of time. The software runs very smoothly and is priced reasonably at $79.99. I did wish that they would have included more features for alternative operating systems like Linux. There’s no reason why “Shared Folders” could not work in Linux, but perhaps Parallels were simply devoting their resources for Windows working as smoothly as possible in their 1.0 release. Hopefully for their next version some of these features will be available for other operating systems.

Linux's History

Linux was developed as a freely distributable version of UNIX. UNIX is the most widely used operating system in the world and has long been the standard for high-performance workstations and larger servers. UNIX, first developed in 1969, has a strong programmer-oriented user group that supports the operating system.

"How did UNIX get its name? It was based on an operating systems called MULTICS (MULTiplexed Information and Computing System). Ken Thompson, Dennis Ritchie, and Brian Kernighan were involved the design of a new operating system based on MULTICS that would be much simpler. They called the new operating system UNICS (Uniplexed Information and Computing System), which was quickly changed to UNIX."

Because UNIX is a commercial product, it must be bought for each platform it runs on. Licensing fees for UNIX versions for PC machines range from a few hundred dollars to several thousand. In an attempt to make UNIX widely available for no cost to those who want to experiment with it, a number of public domain UNIX systems have been developed over the years.

One of the early UNIX workalikes was Minix, written by Andy Tanenbaum. Although Minix didn't have a full range of features, it provided a small operating system that could be used on PC machines. To expand on Minix, a number of users started developing an enhanced operating system that would take advantage of the 80386 CPU's architecture. One of the primary developers of this system, which became known as Linux, was Linus Torvalds of the University of Helsinki. He released an early version of Linux in 1991. A first commercial, almost bug-free release was unleashed to the programming community in March 1992.

Soon, many programmers were working on Linux, and as the challenge and excitement of producing a growing UNIX workalike caught on, Linux grew at a remarkable rate. As the number of developers working on Linux grew, the entire UNIX workalike operating system was eventually completed and now includes all the tools you will find in a commercial UNIX product. Linux continues to grow as programmers adapt features and programs that were originally written as commercial UNIX products to Linux. New versions of Linux and its utilities are appearing at an astounding rate. New releases often appear weekly.

To avoid any charges for Linux, the Linux developers do not use any code from other UNIX systems. There are no licensing fees involved with the Linux operating system, and part of its mandate is to be freely available. Some companies have undertaken the task of assembling and testing versions of Linux, which they package on a CD-ROM for a (usually) minimal price.

Linux is not based on a single version of UNIX; it is a consolidation of the best features of BSD UNIX and System V. BSD UNIX was developed at the University of California at Berkeley, starting in 1977. Several major releases increased the power of BSD UNIX. Several standard UNIX programs originated at BSD, although BSD stopped its UNIX development in the early 1990s. AT&T, which developed the first version of UNIX, continued their UNIX development by producing a series of UNIX versions called System III, System IV, and System V. Linux uses the last primary release of BSD UNIX called 4.4BSD as its base and takes some other features from the latest release of System V, called System V Release 4 (SVR4).

Linux's Kernel

Linux is a complete multitasking, multiuser operating system that behaves like the UNIX operating system in terms of kernel behavior and peripheral support. Linux has all the features of UNIX, plus several recent extensions that add new versatility to Linux. All source code for Linux and its utilities is freely available.

The Linux kernel was originally developed for the Intel 80386 CPU's protected mode. The 80386 was designed with multitasking in mind (despite the fact that most of the Intel CPUs are used with single-tasking DOS), and Linux makes good use of the advanced features built into the CPU's instruction set. Memory management is especially strong with the 80386 (compared to earlier CPUs). A floating-point emulation routine allows Linux to function on machines that do not have math coprocessors (such as the SX series of Intel CPUs).

Linux allows shared executables so that if more than one copy of a particular application is loaded (either by one user running several identical tasks, or several users running the same task), all the tasks can share the same memory. This process, called copy-on-write pages, makes for much more efficient use of RAM.

The Linux kernel also supports demand paging, which means that only sections of a program that are necessary are read into RAM. To further optimize memory usage, Linux uses a unified memory pool. This pool enables all free memory on the system to be used as disk cache, effectively speeding up access to frequently used programs and data. As memory usage increases, the amount of cache is automatically adjusted.

To support large memory requirements when only small amounts of physical RAM are available, Linux supports swap space. Swap space enables pages of memory to be written to a reserved area of a disk and treated as an extension of physical memory. By moving pages back and forth between the swap space and RAM, Linux can effectively behave as if it had more physical RAM than it does, albeit at the cost of some speed due to the hard drive's slower access.

Linux uses dynamically shared libraries extensively. Dynamically shared libraries use a common library section for many different applications, effectively reducing the size of each application. Linux does allow full library linking (called statically linked libraries) for portability to machines that may not have the dynamic libraries.

To make Linux widely acceptable, it supports a number of different filesystems, including those compatible with DOS and OS/2. Linux's own primary filesystem, called ext2fs, is designed for optimal use of the disk.

Linux is ideally suited for application development and experimentation with new languages. Several different compilers, including C, C++, Fortran, Pascal, Modula-2, LISP, Ada, Basic, and Smalltalk, come with the distribution software. Many of the Linux compilers, tools, debuggers, and editors are from the Free Software Foundation's GNU project.

Recover GNU/Linux root password.

What's happening if you forget root password on your GNU/Linux system? You could reformat your hard-drive and then install OS and software, or you can start your system in single user mode.

Some distributions like Ubuntu, inside menu which you can call while you startup your system, offer Recovery Mode or Single-User mode. If you have this kind of problem it is enough that you choose this item and fallow next steps. Otherwise you need to add this item inside menu (which could be called by pressing on ESC button on keyboard). Using arrows on keyboard choose menu which you want to change, press button E on keyboard and again use arrows on keyboard to choose kernel line and again press E. Now at the end of this line add word "single".

Now you need to press ESC to go back and then use button B to load this kernel. Your System will startup as usual, but maybe with command prompt. To change password all you need to do is to type command "password" and you will be asked to add your new password (you need to insert this password two time, just for security reasons), while older password is not necessary.

Windows services - Converting between key and display names

We've demonstrated how to check the status of Windows services and how to control them. One element missing from those functions was a way to convert between key and display names of Windows services.

That's right, a Windows service has two names. The long name you see in the Control Panel is the display name of the service. The internal shorter name of the serivce is called the key name. Most functions require that you use the key name of a service, so here's a function to convert a display name to a key name.

uses WinSvc;

//-------------------------------------
// Get the service key name that is
// associated with a specified
// service's display name
// ie: 'Browser' is the key name for
// 'Computer Browser'
//
// sMachine:
// machine name, ie: \SERVER
// empty = local machine
//


// sService
// service display name,
// ie: 'Computer Browser'
//
function ServiceGetKeyName(
sMachine,
sServiceDispName : string ) : string;
var
//
// service control
// manager handle
schm : SC_Handle;

//
// max key name len
nMaxNameLen : integer;

//
// temp. string
psServiceName : PChar;
begin
Result := '';

// expect a service key
// name shorter than 255
// characters
nMaxNameLen := 255;

// connect to the service
// control manager
schm := OpenSCManager(
PChar(sMachine),
Nil,
SC_MANAGER_CONNECT);

// if successful...
if(schm > 0)then
begin
psServiceName :=
StrAlloc(nMaxNameLen+1);

if(nil <> psServiceName)then
begin
if( GetServiceKeyName(
schm,
PChar(sServiceDispName),
psServiceName,
nMaxNameLen ) )then
begin
psServiceName
[nMaxNameLen] := #0;

Result :=
StrPas( psServiceName );
end;

StrDispose(psServiceName);
end;

// close service control
// manager handle
CloseServiceHandle(schm);
end;
end;
Delphi code. Download disp2key

For example, "ServiceGetKeyName( '', 'Computer Browser' )" will return "Browser", "browser" being the key name that you can pass to Windows services related functions. Of course, you may also have a need to convert a key name to a display name:

uses WinSvc;

//-------------------------------------
// Get the service display name that is
// associated with a specified
// service's display name
// ie: 'Computer Browser' is the
// display name for 'Browser'
//
// sMachine:
// machine name, ie: \SERVER
// empty = local machine
//
// sService
// service key name,
// ie: 'Browser'
//
function ServiceGetDisplayName(
sMachine,
sServiceKeyName : string ) : string;
var
//
// service control
// manager handle
schm : SC_Handle;

//
// max display name len
nMaxNameLen : integer;

//
// temp. string
psServiceName : PChar;
begin
Result := '';

// expect a service display
// name shorter than 255
// characters
nMaxNameLen := 255;

// connect to the service
// control manager
schm := OpenSCManager(
PChar(sMachine),
Nil,
SC_MANAGER_CONNECT);

// if successful...
if(schm > 0)then
begin
psServiceName :=
StrAlloc(nMaxNameLen+1);

if(nil <> psServiceName)then
begin
if( GetServiceDisplayName(
schm,
PChar(sServiceKeyName),
psServiceName,
nMaxNameLen ) )then
begin
psServiceName
[nMaxNameLen] := #0;

Result :=
StrPas( psServiceName );
end;

StrDispose(psServiceName);
end;

// close service control
// manager handle
CloseServiceHandle(schm);
end;
end;
Delphi code. Download key2disp